Tips for the successful crimping of vials
A contribution from our partner company infochroma ag.
A good quality crimping tool excels with the following features:
- hardened crimp jaws for a long endurance
- crimping pressure and height can be adjusted
infochroma ag has three types of crimping tools on offer:
Crimper for the laboratory
A quality crimper for the laboratory features a chemically resistant surface varnishing
Crimper for the clean room
A crimper for the clean room is manufactured from stainless steel. It is resistant to corrosion and heat and can be autoclaved.
Crimper for Flip-Off of Flush-Side caps
Available for the laboratory or the clean room.
Adjusting crimping pressure and height
Depending on the crimp neck, the properties of the cap beading and the thickness of the septum, the crimping pressure and height have to be adjusted. Even if always the same vial/cap/septum combination is used, these two parameters should be checked and may have to be adjusted each time the crimping tool is reused.
The crimping pressure is adjusted with the adjustable screw in the crimper’s handle.
The crimping height is adjusted with the provided hex-wrench. Hold the crimping tool by its head and put the hex-wrench in the intended recess in the crimping head.
- By turning the hex-wrench to the right, the crimping head moves upwards, the crimped cap sits looser.
- By turning the hex-wrench to the left, the crimping head moves down, the crimped cap sits tighter.
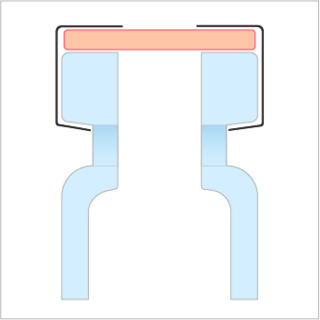
The cap is crimped correctly
The aluminium of the beading sits closely around the crimp neck. The beading is flat and undamaged, the surfaces of both cap and septum are flat.
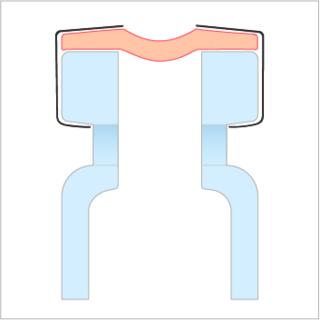
The cap is overcrimped
The surface of the septum is convex
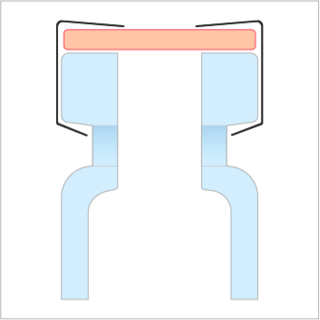
The cap is undercrimped
The aluminium of the beading does not sit closely around the crimp neck


